I decided this week to tackle an offensive measure that I’ve had problems with in the past. RE (reverse engineering) and buffer overflows have been weak points of mine for a while now and I’ve been looking for an opportunity to get better at them.
The Source
To make this as easy as possible to learn, I’m going to first show you the source code of the C program I’m using here. We’ll talk about how to identify the buffer overflow and then we’ll learn how to exploit it.
This is a simple and vulnerable program called login. The point of this program is to allow a regular user or an admin to login and visit their respective menus. Obviously there is nothing important here but our goal will be to get access to the admin menu without knowing the username / password combination.
Intended Behavior
This is a screenshot of what the application looks like when it’s running, in case you don’t have the time to compile the application.

Identifying Vulnerable Areas
If you’ve never worked in C or C++ before, you should know that unlike other languages like C# or Java, arrays have no inherent bounds checking. This means that if you do not perform the check yourself or pass the size to a function that can check for you, then there exists a real possibility of writing data outside of bounds. This can overwrite values of other variables or, in this case, return addresses.
If we look at lines 30 and 33 (scanf(“%s”, username) and scanf(“%s”, password)) we can see a call to scanf into the username and password buffers without any size checks. The safer alternative here would be to use a call to fgets because it can limit the size of the input based on a parameter passed into it.
Now that we have identified some areas that we can exploit, let’s talk a little about how we can abuse the stack (where these buffers are being allocated) to give us unauthorized access to the adminMenu function.
Understanding the Stack

This picture illustrates how the stack and heap are aligned in memory. The stack typically grows from the largest memory address to the lowest while the heap does the opposite. Keep this in mind while we’re reverse engineering the login program. You might see statements like lea eax, [ebp-0x18] and it’s important to understand that the -0x18 part means that we’re moving down in memory, up the stack, and closer to heap, not farther from it.
We’ll be talking a little more in depth about what the stack is doing pretty soon but for right now we’re gonna start diving into the reverse engineering.
Reverse Engineering with Binary Ninja
I’ll be using Binary Ninja for disassembling this program. Binary Ninja is a lot like IDA but a little prettier and a lot cheaper. There exists a demo version which will work perfectly for this example. While there exist features like LL IL and Medium IL, we will want to view the program in assembly mode so we can reconstruct the stack.
If you’re following along, make sure to compile the program as follows:
gcc login.c -o login -fno-stack-protector -m32 -static
-o login will set the executable to be called login (optional)
-fno-stack-protector will tell gcc to not put canaries on the stack which would make exploitation significantly harder.
-m32 tells gcc to compile for 32 bit machines (In case you’re on a 64 bit machine)
-static tells gcc to build this as a static application. If you don’t need to link to dynamic libraries you can use this setting to make the application static. I can’t tell you exactly what this does but it does help make the exploitation easier by normalizing the function addresses we want to hit.
Also, if you get problems with compiling a 32 bit application on your 64 bit machine, see this page on fixing that. Since I’m using Kali, a Debian derivative, I ended up doing the following:
apt-get update && apt-get install g++-multilib libc6-dev-i386
Lastly, we will need to disable ASLR (Address Space Layout Randomization). This is a protection that will randomize the addresses of our functions making predicting the function address hard. Here’s how to do that.
sudo bash -c 'echo 0 > /proc/sys/kernel/randomize_va_space' When you’re done with this exercise, just repeat the above statement but with a 2 instead of a 0 . Documentation

This is what Binary Ninja looks like when you open the login program for the first time. Let’s take a look at the main function which we can specify on the left side panel of Binary Ninja.

This looks fairly intimidating right away. However, if we take it slow and Google around enough we can start to understand what we’re looking at. We can see a statement in the first block that says call authenticateUser . This sounds like it would likely be the part of the code that is calling into the authenticateUser function which we already identified to be vulnerable. Let’s take a look at this function.

Looking closely we can begin to identify some “mental anchor-points” which will help us for our first time here. We can see a two calls to _IO_printf which sounds a lot like our printf calls in our code. We can also see __isoc99_scanf which is likely our scanf calls. Now, before we start figuring out how to construct our payload, we need to understand a bit more about the stack and what might be on the stack when we are inside of this function.

We’re gonna be skipping some other instructions but it’s safe to do so in this context because the net action of those other instructions on the stack can be ignored.
The bar on the left is the stack. At the very top of this bar we have the largest memory address and at the bottom we have the very smallest address (this is where the heap would be found). Before this function is called and executed there likely will be other things on the stack. For right now we’ll ignore them, save for one particular value, the return address.
When call <func> is used in x86, a 4 byte return address is placed on the stack before executing the function. The return address is what memory address the EIP (Instruction Pointer) should be set to after the function’s retn statement is executed. When this code is functioning as intended, the return address will point us to somewhere in our main function to return execution to our main function. However, in our example, we will want to change this return address to point to the adminMenu function instead of returning back to the main function so we can gain access to administrator functionality without authorization.
If we look at the provided assembly instruction we can follow along with the statements and how they’re placed on the stack. The first thing we do is push the EBP (Base Pointer) onto the stack. The first two statements here is what is known as a function prologue. This is done whenever a function is called to make sure that the currently executing function, essentially, has its own “context” in memory when referring to memory addresses. At the end of the function there exists a “function epilogue” which will reset the EBP. The EBP is supposed to point to the bottom of the stack frame for this function. The ESP (Stack Pointer) points to the top of the stack (lower address). When we push something onto the stack, the ESP decrements by 4 bytes (for x86).
The second statement, mov ebp, esp says, “Take our current stack pointer, which should be pointing to the memory after where we placed the old EBP, and set it as our base pointer”. This gives us a fresh new stack frame for our function to execute in. After this, we push the value of EBX (Base Register) onto the stack. This register is used, generally, as a base pointer for memory access. When we need to refer to a string later we’ll be using EBX for a relative address to the string.
After some additional instructions we get to the meat of what we’ll be exploiting (the username field portion). The following statement:
lea eax, [ebp-0x18]
Means, “Get the memory address of whatever EBP-0x18 is and set EAX to that value.” This is a full 24 bytes away from our base pointer. This might be a little confusing because we know that our buffer was only 16 bytes. Why is, what we presume to be our buffer, a full 24 bytes?
Remember the EBX we pushed onto the stack? That takes up 4 bytes on the stack that we can’t use. We need, however, to explain a remaining 4 bytes. We’ll get back to this but it’s important to understand exactly where this buffer is located in the stack otherwise you might not get the size of the overflow required, correct.
Next, we push EAX onto the stack which holds the address to our buffer. This will be another 4 bytes. the EAX and EBX on the stack account for the additional 8 bytes that our buffer has accounted for (24–8=16). Then we get the memory address of a string resource we wanted to use for our scanf call coming up and place it on the stack. While this does take up another 4 bytes which would cut our buffer short, we have to understand that when scanf accesses its arguments, it will read the address of the string here and then not care what happens to this memory address. This means that we will be free to use the full 16 bytes of memory. You can see this part if you look for the purple region on the left of the image. It shows you the 0x10 (16 byte) region that the buffer takes up after the string resource is pop’d off the stack. If I had made the string a variable and passed that in instead I imagine the buffer would be further down in memory.
Getting Our Destination
With Binary Ninja this is actually really simple. We want to land ourselves in the adminMenu function so all we have to do is right click on the adminMenu function in Binary Ninja and click “copy address”. There are a couple of other ways to do this like using nm or gdb but this is probably the easiest.
The address of my adminMenu function is the following: 0x8048b3e
Building the Exploit
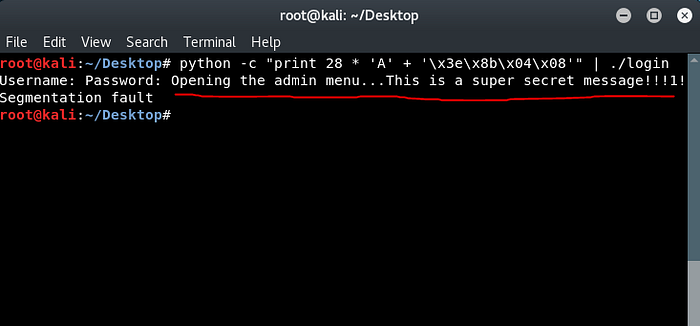
Let’s look at that picture again. How many bytes away is our buffer from the return address? Well we know that our buffer is 0x18 (24) bytes from the EBP. We also know that the old EBP is stored on the stack (another 4 bytes). Finally, the return address is, itself, 4 bytes. We need to essentially write 24 + 4 bytes of garbage and then 4 bytes for the return address. We can do this using python, a popular method of delivering this kind of payload.
python -c "print 28 * 'A' + '\x3e\x8b\x04\x08'" | ./login
This will perform the buffer overflow and adjust the return address to point to 0x8048b3e , the admin menu function.
Yay!
You might notice that we wrote the memory address for the function somewhat backwards when writing our python line. This is because memory addresses in x86 use little endian format. Essentially, for our 4 byte blocks the least significant byte is first and onward. This makes 0x08048b3e become 0x3e, 0x8b, 0x04, 0x08 .
Closing Remarks
I hope that this makes up for having to write about x.509 certificates last week! This was a lot more fun to spend the time to figure out. I’m still, by no means, an expert with this stuff. But, you know what they say, the best way to learn something is to teach it!
See ya next week!